目次
はじめに
ビットコインなどの取引所で、ほぼ確実に用意されているワンタイムパスワード認証を実装したいと思います。
環境
この記事は、以下の管理人の検証環境にて記事にしています。
| PHP | 7.4 |
| PHPGangsta | 1.0.1 |
シークレットキー生成用のライブラリを取得する
まずワンタイムパスワードのシークレットキーを生成する為のライブラリを
GitHubからダウンロードします。
ファイル構成
ダウンロードしたら下記の階層とファイルを準備します。
├─ init.php
├─ login.php
└─ PHPGangsta
  └─ GoogleAuthenticator.php
シークレットキー生成サンプル(init.php)
init.phpで、シークレットキーの生成サンプルを作成します。
<?php
require_once 'PHPGangsta/GoogleAuthenticator.php';
$ga = new PHPGangsta_GoogleAuthenticator();
$secret = $ga->createSecret();
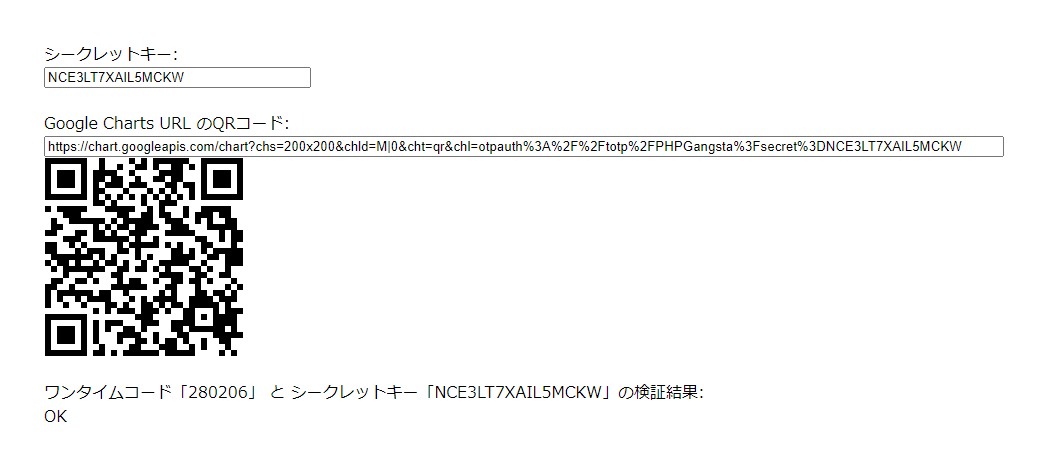
echo "シークレットキー: <br>";
echo '<input type="text" value="'.$secret.'" style="width:20em" readonly><br><br>';
$qrCodeUrl = $ga->getQRCodeGoogleUrl('PHPGangsta', $secret);
echo "Google Charts URL のQRコード: <br>";
echo '<input type="text" value="'.$qrCodeUrl.'" style="width:72em" readonly><br>';
echo '<img src="'.$qrCodeUrl.'" /><br><br>';
$oneCode = $ga->getCode($secret);
echo "ワンタイムコード「{$oneCode}」 と シークレットキー「{$secret}」の検証結果:<br>";
$checkResult = $ga->verifyCode($secret, $oneCode, 2);
if ($checkResult) {
echo 'OK';
} else {
echo 'FAILED';
}
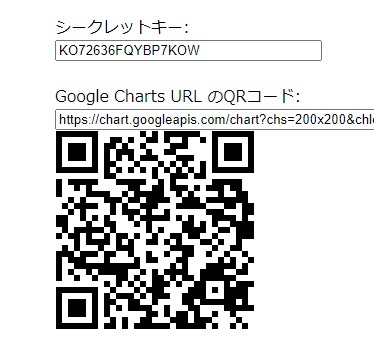
上記を動かすと、下記のようになります。
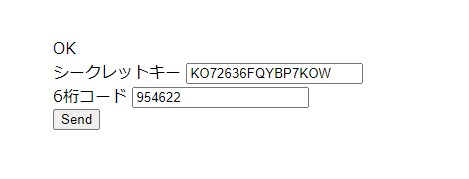
ログイン用サンプル(login.php)
本当は、シークレットキーをDBに保存した方が良いのですが、今回は動作確認用のサンプルなので、シークレットキーを直接入力します。
<?php
require_once 'PHPGangsta/GoogleAuthenticator.php';

if(isset($_POST['send'])){
  $ga = new PHPGangsta_GoogleAuthenticator();
  $checkResult = $ga->verifyCode($_POST['secretkey'], $_POST['gacode'], 2);
  if ($checkResult) {
    echo 'OK';
  } else {
    echo 'FAILED';
  }
}
?>

<html>
  <body>
    <form action="" method="post">
     <div>
       シークレットキー
       <input type="text" name="secretkey">
     </div>
     <div>
       6桁コード
       <input type="text" name="gacode">
     </div>
     <div><button type="submit" name="send" value="send">Send</button>
    </form>
  </body>
</html>
上記を動かすと、下記のようになります。
Google Authenticatorアプリをインストール
発行されたシークレットキーからワンタイムパスワードを生成する為に、iOSもしくはAndroidでGoogle Authenticatorをインストールします。


動作検証
まずinit.phpで生成したQRコードを、Google Authenticatorに取り込みます。
取り込むと下記のように6桁のワンタイムパスワードが表示されます。

login.phpで、シークレットキーと6桁パスワードを入力して、ログインが成功したら完了です。