目次
はじめに
最近クライアントのお問い合わせに迷惑メールbotが永遠とメールを送り続けるという話が増えていました。
当然ながら完了ページでF5連打してメールを送り続けるという手法ではなく、botが入力ページから入力して送るという手順を踏んでいるようで(CSRF対策も無駄)、完全にお手上げ状態でした。
そこで、前から存在は知っていたものの、実装の勉強が面倒臭いというので放置していたGoogle reCAPTCHAを実装してみることにしました。
手順
最初のページ
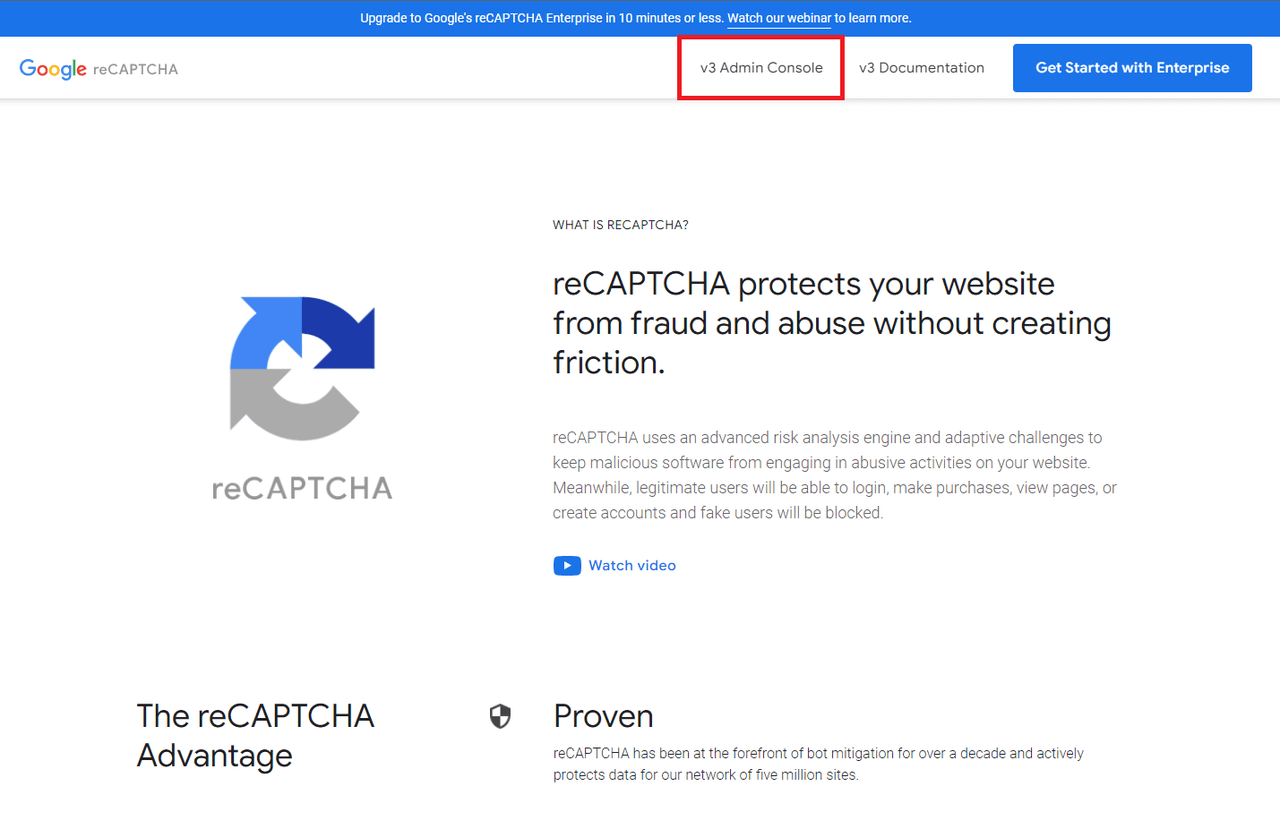
まず下記のURLにアクセスする。
https://www.google.com/recaptcha/intro/v3.html
右上のボタンをクリックする。
新規作成ページ
初回作成の場合は、すぐにreCAPTCHAの新規作成ページに移動する。
1つでも作成している場合は、ダッシュボードに移動する。
以下が新規作成ページのURL
https://www.google.com/recaptcha/admin/create

ここからは、V3とV2で分岐して解説します。
reCAPTCHA V3 向け手順
reCAPTCHA V3 のキーを取得
reCAPTCHA V3を利用する場合は、以下の手順になる。
まずreCAPTCHAの種類で「reCAPTCHA V3」を選択する。
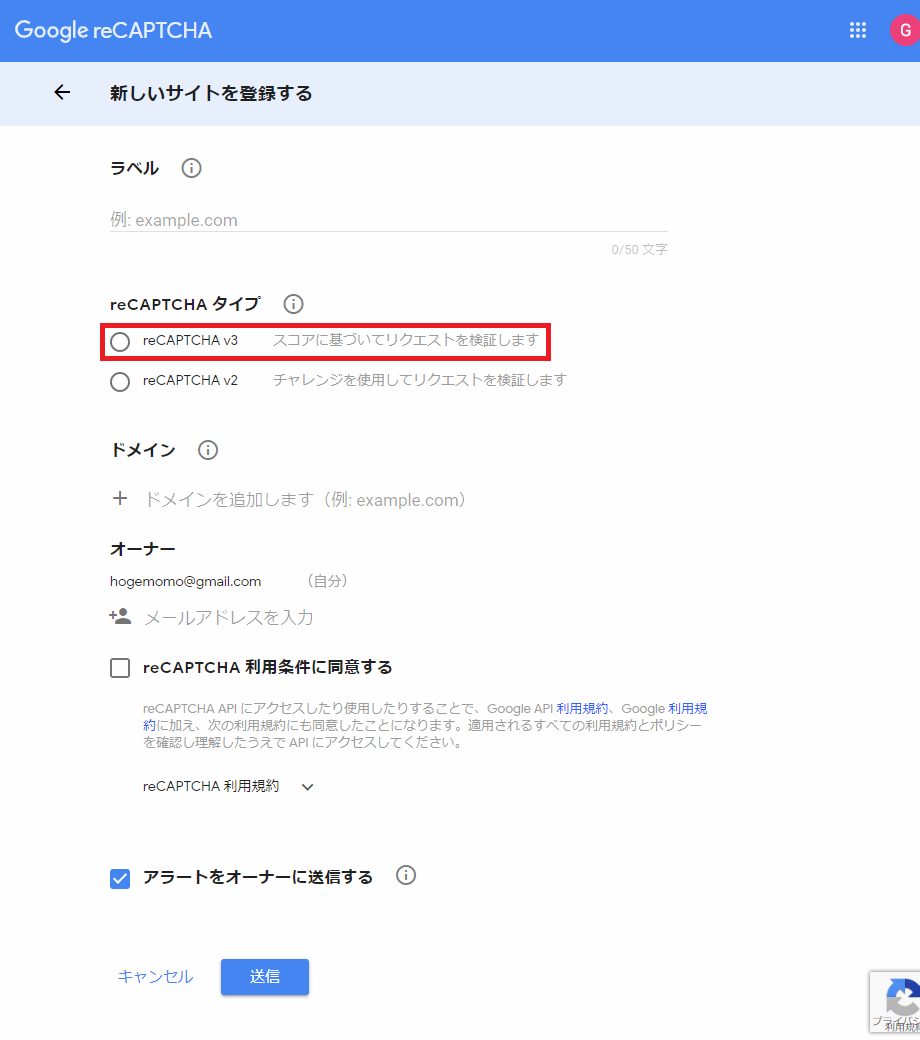
その後に該当の入力項目を入力する。

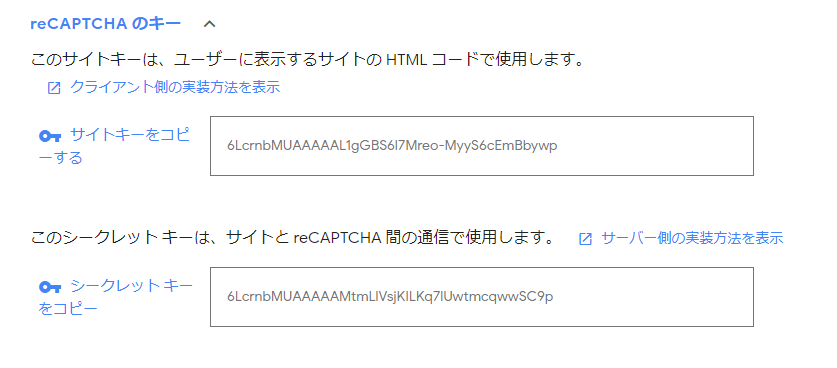
すべてを入力して、「送信」ボタンをクリックすると「reCAPTCHAのキー」が作成される。
このキー2つは後々利用するので、ページを残しておきます。
もし閉じてしまっても、今回作成したreCAPTCHAの編集ページで再度確認することが可能です。
reCAPTCHA V3 を実装する
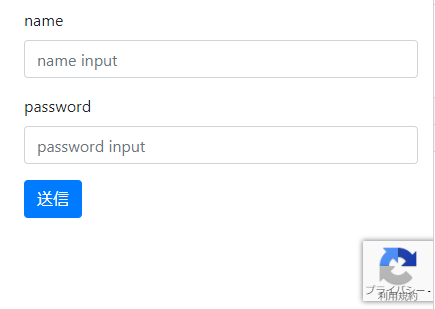
ひとまず動かして確認したい人向けにサンプルのソースコードを準備しました。
以下を利用してください。
<?php
// サイトキーを入力
$key = '';
// シークレット キーを入力
$secretKey = '';
if (isset($_POST['name']) && isset($_POST['password']))
{
  $Response = file_get_contents('https://www.google.com/recaptcha/api/siteverify?secret='.$secretKey.'&response='.$_POST['g-recaptcha-response']);
  $result = json_decode($Response);
  if ($result->success)
  {
    $message = 'success';
    $status = 'success';
  }
  else
  {
    $message = $result->{'error-codes'}[0];
    $status = 'danger';
  }
}
?>
<!DOCTYPE html>
<html lang="ja">
<head>
  <meta charset="UTF-8">
  <title>Title</title>
  <link rel="stylesheet" href="https://stackpath.bootstrapcdn.com/bootstrap/4.3.1/css/bootstrap.min.css" integrity="sha384-ggOyR0iXCbMQv3Xipma34MD+dH/1fQ784/j6cY/iJTQUOhcWr7x9JvoRxT2MZw1T" crossorigin="anonymous">
  <script src="https://www.google.com/recaptcha/api.js?render=<?php echo $key ?>"></script>
  <script>
  grecaptcha.ready(function() {
    grecaptcha.execute('<?php echo $key ?>', {action: 'login'}).then(function(token) {
	var reCAPTCHA = document.getElementById('recaptcha');
     	reCAPTCHA.value = token;
    });
  });
  </script>
</head>
<body>
  <div class="content">
    <div class="col-sm-5">
      <?php echo isset($message) ? sprintf('<div class="alert alert-%s" role="alert">%s</div>',$status,$message):'' ?>
      <form class="form" method="post">
        <div class="form-group">
	  <label for="formGroupExampleInput">name</label>
	  <input type="text" class="form-control" id="formGroupExampleInput" placeholder="name input" name="name">
	</div>
	<div class="form-group">
	  <label for="formGroupExampleInput2">password</label>
	  <input type="password" class="form-control" id="formGroupExampleInput2" placeholder="password input" name="password">
	</div>
	<input type="hidden" name="g-recaptcha-response" id="recaptcha" />
	<button type="submit" class="btn btn-primary">送信</button>
      </form>
    </div>
  </div>
</body>
</html>
reCAPTCHA V2 向け手順
reCAPTCHA V2 のキーを取得
reCAPTCHA V2を利用する場合は、以下の手順になる。
まずreCAPTCHAの種類で「reCAPTCHA V2」を選択する。
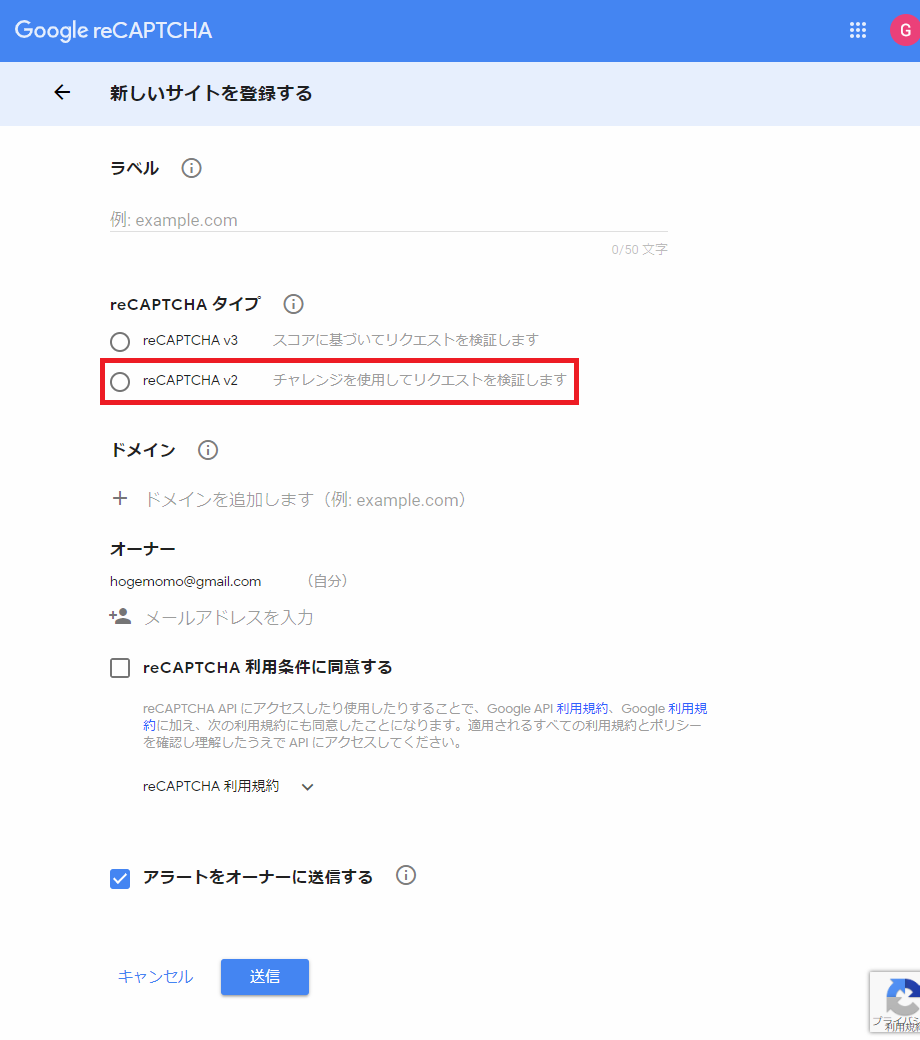
その後に該当の入力項目を入力する。
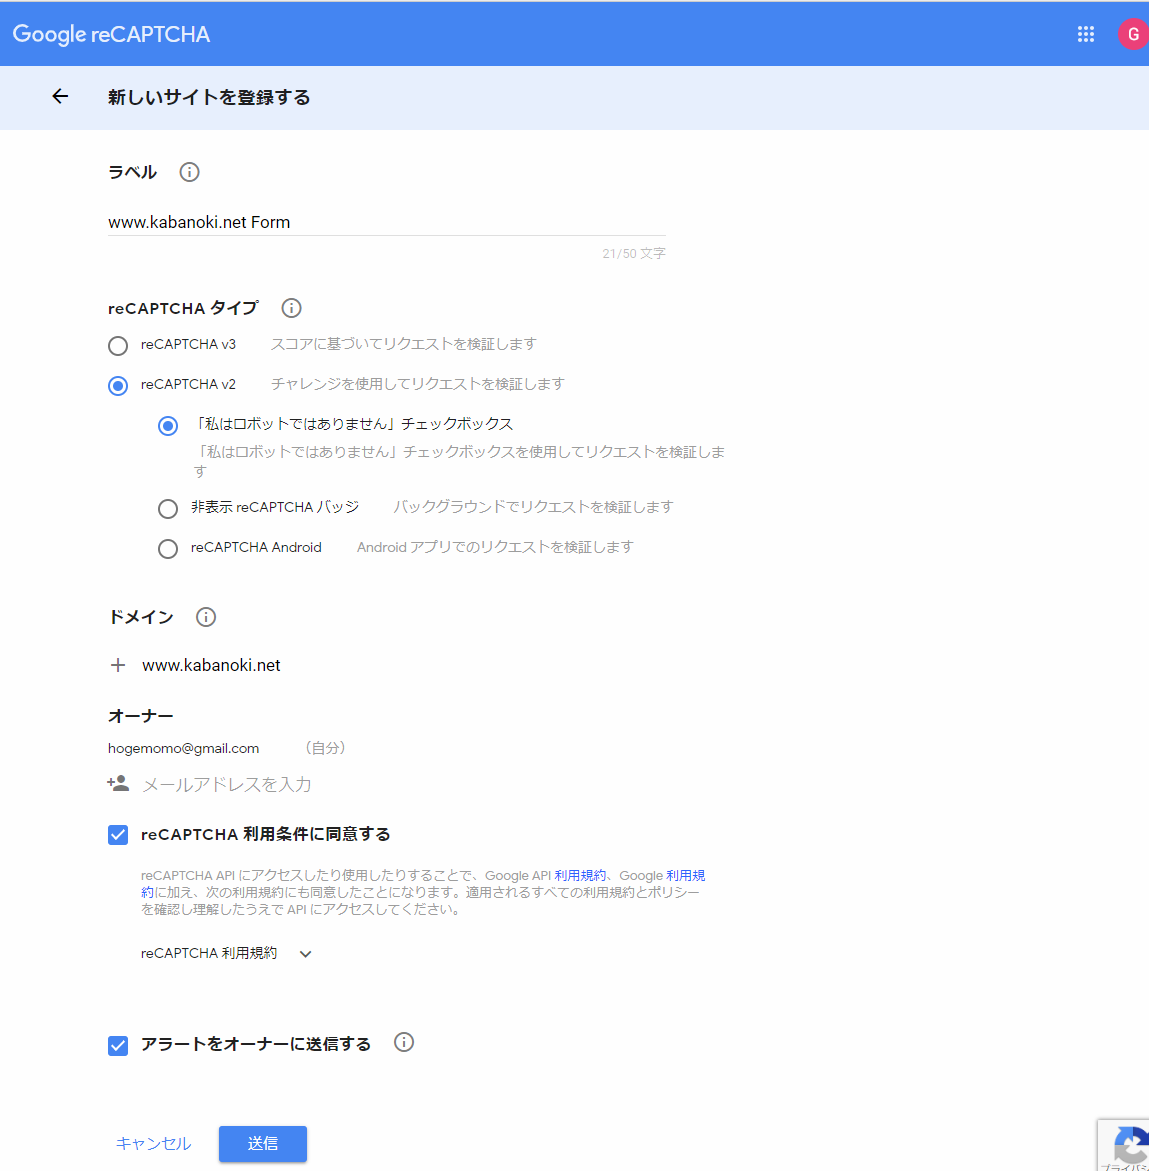
すべてを入力して、「送信」ボタンをクリックすると「reCAPTCHAのキー」が作成される。
このキー2つは後々利用するので、ページを残しておきます。
もし閉じてしまっても、今回作成したreCAPTCHAの編集ページで再度確認することが可能です。
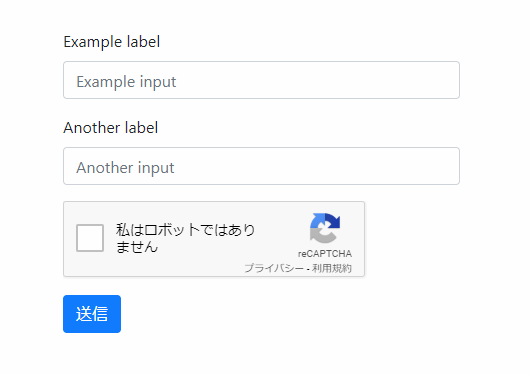
reCAPTCHA V2 を実装する
ひとまず動かして確認したい人向けにサンプルのソースコードを準備しました。
以下を利用してください。
<?php
// サイトキーを入力
$key = '';
// シークレット キーを入力
$secretKey = '';
if (isset($_POST['name']) && isset($_POST['password']))
{
  $Response = file_get_contents('https://www.google.com/recaptcha/api/siteverify?secret='.$secretKey.'&response='.$_POST['g-recaptcha-response']);
  $result = json_decode($Response);
  if ($result->success)
  {
    $message = 'success';
    $status = 'success';
  }
  else
  {
    $message = $result->{'error-codes'}[0];
    $status = 'danger';
  }
}
?>
<!DOCTYPE html>
<html lang="ja">
<head>
  <meta charset="UTF-8">
  <title>Title</title>
  <link rel="stylesheet" href="https://stackpath.bootstrapcdn.com/bootstrap/4.3.1/css/bootstrap.min.css" integrity="sha384-ggOyR0iXCbMQv3Xipma34MD+dH/1fQ784/j6cY/iJTQUOhcWr7x9JvoRxT2MZw1T" crossorigin="anonymous">
  <script type="text/javascript">
  var onloadCallback = function() {
    grecaptcha.render('html_element', {
       'sitekey' : '<?php echo $key ?>'
    });
  };
  </script>
  <script src="https://www.google.com/recaptcha/api.js?onload=onloadCallback&render=explicit" async defer></script>
</head>
<body>
  <div class="content">
    <div class="col-sm-5">
      <?php echo isset($message) ? sprintf('<div class="alert alert-%s" role="alert">%s</div>',$status,$message):'' ?>
      <form class="form" method="post">
        <div class="form-group">
          <label for="formGroupExampleInput">name</label>
          <input type="text" class="form-control" id="formGroupExampleInput" placeholder="name input" name="name">
        </div>
        <div class="form-group">
          <label for="formGroupExampleInput2">password</label>
          <input type="password" class="form-control" id="formGroupExampleInput2" placeholder="password input" name="password">
        </div>
        <div class="form-group">
	  <div id="html_element"></div>
	</div>
        <button type="submit" class="btn btn-primary">送信</button>
      </form>
    </div>
  </div>
</body>
さいごに
reCAPTCHA の設定手順でした。
ドキュメントを読むだけで、簡単に実装できてしまい拍子抜けしてしまいました。
V3の方がユーザーに負担が少ないけれど、5分間という制限があるので、ケースバイケースでV2を使うのもありかなと思いました。
今日はこの辺でー